
Enable the Living Control Set
⚠️Prerequisites:
- Client must be associated with an Organization
- You must have admin access to the Organization
Enabling the Living Control Set begins at the Organization level. Clients associated with the Organization will inherit the configuration automatically.
Enabling at the Organization Level
-
Navigate to Administration > Manage Organization and select Edit
-
Go to the Configuration tab and select the FASCR tab
-
Enable the FASCR toggle, select the Master Control Library option and Save
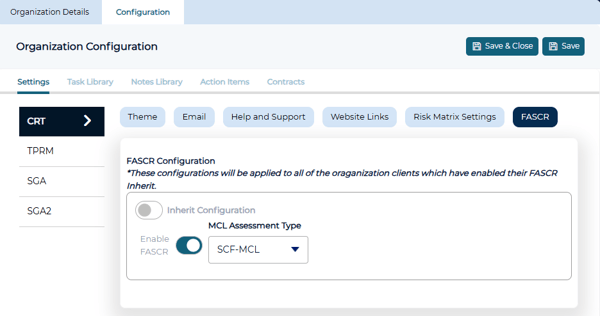
💡 FASCR (Framework Agnostic Security, Compliance and Resilience) is the CRT's operational model that powers the Living Control Set. Learn more about it here.
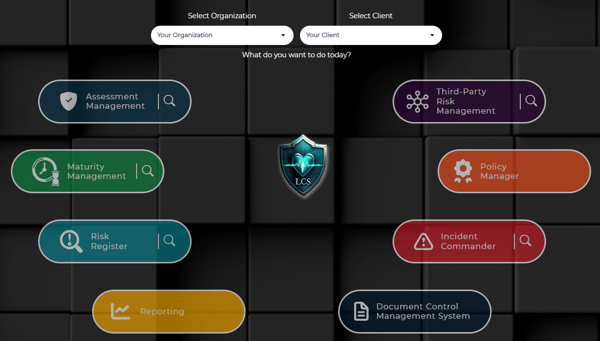
Once enabled, a new LCS icon will appear in the center of the main dashboard. This is your entry point for creating and managing the Living Control Set.
Create the Living Control Set
⚠️ Prerequisite: You must be a Compliance Admin to access the LCS.
Once the Living Control Set has been enabled for a client, the setup wizard will guide you through creation. Each client can only have one Living Control Set.
From the main dashboard, select the LCS icon in the middle of the screen to launch the setup wizard.
Step 1 - Select a Creation Method
The wizard presents four options for building your Living Control Set. Select the method that best fits your organization's starting point.
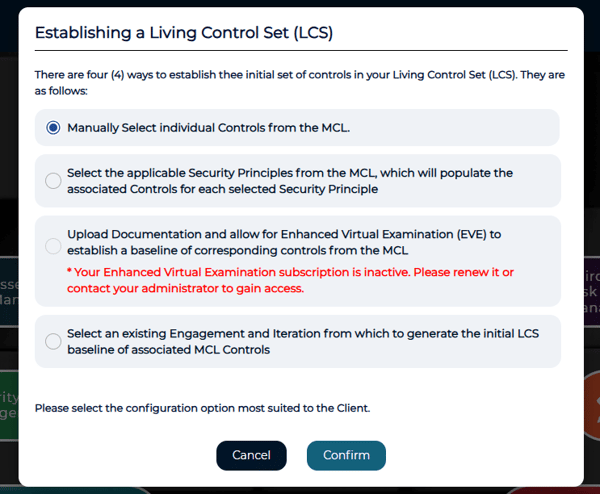
- Manually Select individual Controls from the MCL Browse and select controls directly from the Master Control Library. This is the fastest way to get started and gives you full control over your initial selection.
- Select the applicable Security Principles from the MCL Choose one or more Security Principles and the associated controls will populate automatically based on your selections.
- Upload Documentation and allow for Enhanced Virtual Examination (EVE) to establish a baseline of corresponding controls from the MCL EVE analyzes your existing policy and procedure documentation to identify and map controls automatically. This option requires an active EVE AI subscription.
- Select an existing Engagement and Iteration from which to generate the initial LCS baseline of associated MCL Controls Builds the Living Control Set from controls in an existing engagement.
Step 3 - Build the Living Control Set
Each creation method has its own configuration steps. Follow the section that matches the method you selected in Step 2.
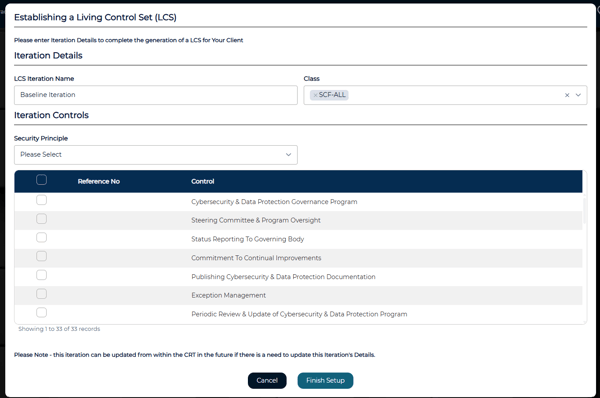
Manual Selection
1. Enter a name for the Iteration
2. Select classes to populate the available controls
3. Use filters to narrow your options and select all controls you want to include
4. Select Finish Setup and confirm the prompt to finalize and create the Living Control Set
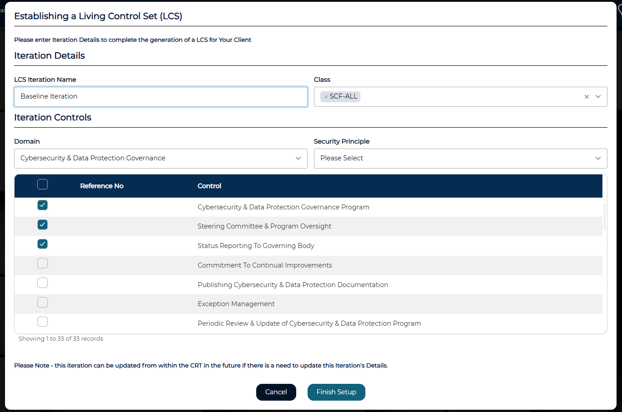
💡Classes represent the individual frameworks included in the Secure Controls Framework (SCF). You can select one or more specific frameworks or select the SCF to browse the full control set.
Security Principles
1. Enter a name for the Iteration
2. Select classes to populate the available controls
3. Use filters to narrow your options and select all controls you want to include
4. Select Finish Setup and confirm the prompt to finalize and create the Living Control Set
💡Classes represent the individual frameworks included in the Secure Controls Framework (SCF). You can select one or more specific frameworks or select the SCF to browse the full control set.
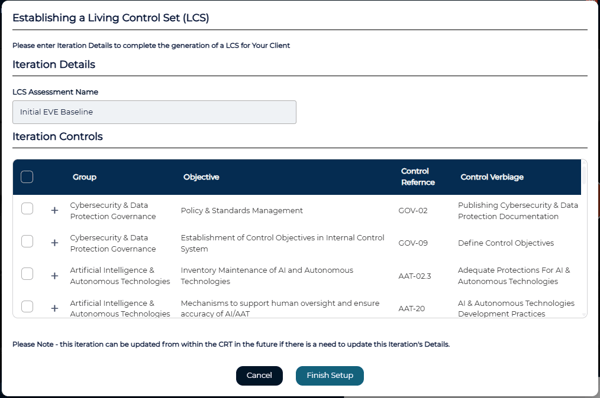
Enhanced Virtual Examination (EVE)
⚠️ This option requires and active EVE AI subscription.
💡 For best results, review the document preparation guide before uploading.
1. In the Enhanced Virtual Examination Analysis popup, add files that you want analyzed and select Submit to begin processing
2. To monitor processing progress, select the LCS icon on the main dashboard.
3. When processing completes, you will receive a notification. Select OK to view the results.
5. Review the controls the Enhanced Virtual Examination identified and select all controls you want to include in the Living Control Set.
6. Select Finish Setup and confirm the prompt to finalize and create the Living Control Set.
Existing Engagement
1. Enter a name for the Iteration
2. Select the engagement you'd like to build from
3. Select all controls you want to include
4. Select Finish Setup and confirm the prompt to finalize and create the Living Control Set
SCREENSHOT ‼️
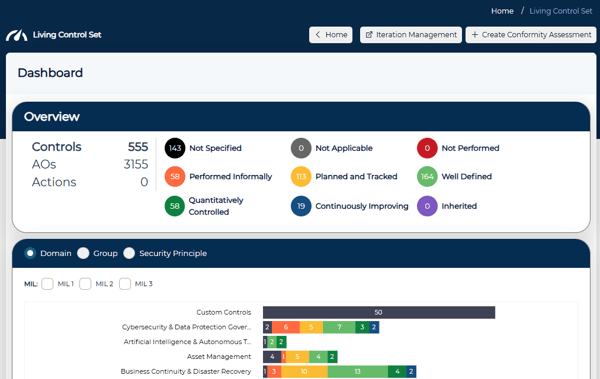
Finding Your Living Control Set
Once created, you will be taken directly to the Living Control Set Dashboard. From this point forward, the LCS icon on the main dashboard will bring you here.
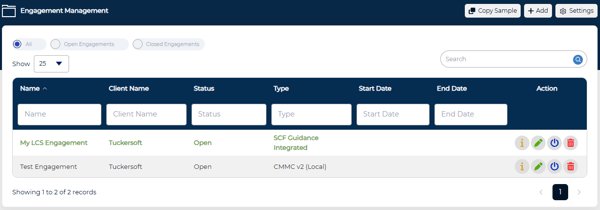
To locate your LCS Engagement, navigate to the Assessment Management module and open the Engagement List. It will appear in bold green text to make it easily identifiable.
Link a Repository to the Living Control Set
It's recommended to link a repository to your Living Control Set before starting any work in an assessment. A repository is where your evidence files are stored, and linking it early avoids interruptions to your workflow.
1. Navigate to Assessment Management > Engagement Management and select Settings in the top right
2. On the Repository tab, locate the repository you want to connect and select the engagement configuration icon
3. In the Engagement Configuration screen, check the box next to the Living Control Set and select Save

💡If you don't have a repository set up yet, see File Repository Setup.