
The traditional 5×5 Risk Matrix is configurable within the CRT. Users can define their own custom risk matrix to better suit their organization's risk scoring, configure it in advance, and enable it when ready.
Overview
Setting up the Custom Risk Matrix is a two-step process: configure first, enable when ready. The system will continue using the default 5×5 matrix until you enable your custom configuration, allowing you to build your matrix without disrupting active Risk Register activities.
Risk Rating Calculation Methods
Before configuring your matrix, decide how risk scores will be calculated. Choose from two options:
-
Addition: Risk Score = Row Value + Column Value
-
Multiplication: Risk Score = Row Value x Column Value
Example: If Row 4 has a score of 7 and Column 3 has a score of 5:
- Additive: 5 + 7 = 12
- Multiplicative: 5 x 7 = 35
Configuring the Custom Risk Matrix
You can complete all configuration settings in advance while the CRT continues operating with the default 5x5 matrix. Nothing changes for users until you select to enable the custom matrix.
Where to configure
The custom risk matrix can be set at three different levels. Please refer to the one that applies to you.
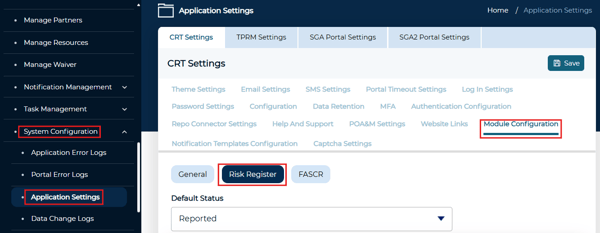
Instance Level: Applies across all organizations and clients within the instance
1. Navigate to System Configuration > Application Settings > Module Configuration
2. Select the Risk Register tab to access the Custom Risk Matrix configuration fields
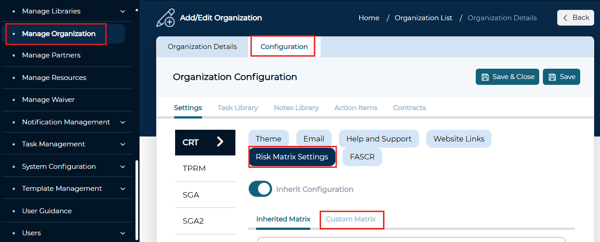
Organization Level: Applies to all clients within the specified organization unless overridden at the client level
1. Navigate to Manage Organization > Edit Organization > Configuration Tab
2. Select the Risk Register tab.
3. Select the Custom Matrix tab to access the configuration fields.
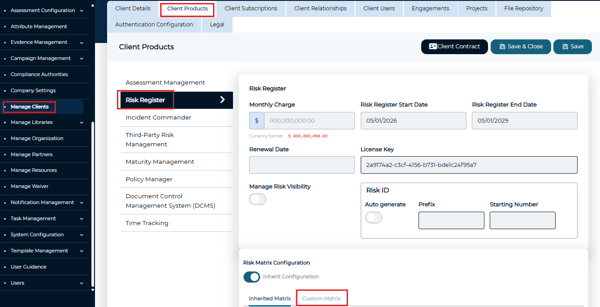
Client Level: Applies exclusively to that individual client.
1. Navigate to Manage Clients > Edit Client > Client Products
2. Select the Risk Register tab.
3. Select the Custom Matrix tab towards the bottom to access the configuration fields.
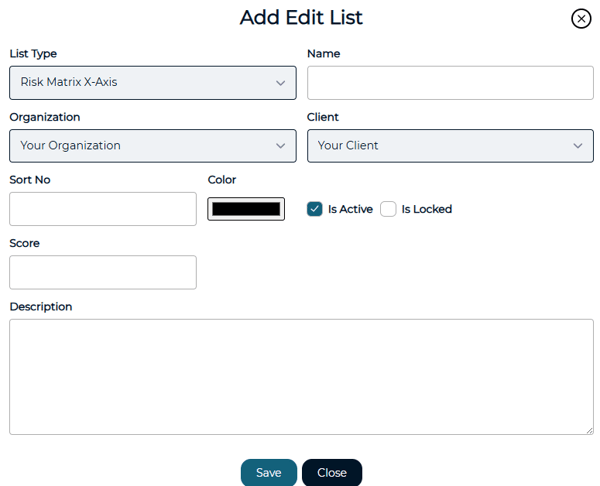
Configuring the Custom Risk Matrix
1. Enter the label and number of rows for the X-Axis (horizontal axis)
2. Enter the label and number of columns for the Y-Axis (vertical axis)
3. Toggle the preferred Risk Rating Calculation method
4. Define values for each Risk Matrix component (X-Axis, Y-Axis, and Risk Rating)
a. Choose the component from the dropdown
b. Click Add to enter component details and Save once complete.
Enabling the Custom Risk Matrix
⚠️ Before enabling, communicate the upcoming change with Risk Managers, Risk Owners, Risk Admins, and all other stakeholders involved with the Risk Register. We also recommend enabling either before starting Risk Register activities or during off-peak hours to minimize impact on users.
Once your configuration is complete, you can enable the Custom Risk Matrix to begin using your configured values. The enable action differs slightly by level:
- Instance Level: Toggle Custom Configuration on.
- Organization Level: Toggle Inherit Configuration off.
- Client Level: Toggle Inherit Configuration off.
When enabling the Custom Risk Matrix at any level, you will be prompted to confirm your choice.
Once enabled, all risks will use the new risk matrix methodology. After enabling, review existing risks to ensure alignment with the updated matrix and make any necessary adjustments.