Planning a Campaign
Before creating a Campaign, consider access method, licensing and the assessment type.
Access Method
There are two ways recipients can access a Campaign:
-
CRT Platform: Requires a client or entity license and supports iterations for trending performance over time.
-
Self Guided Assessment (SGA): Does not require a license and provides a one time snapshot without historical trending.
Use SGA for prospecting, quick assessments, or entities without licenses. Use CRT for full engagements and long term analysis.
Framework Selection
You can use an existing compliance framework or create a custom micro assessment. Select a framework that aligns with the business objective, such as readiness comparison, trend analysis, or targeted risk evaluation.Creating a Campaign
1. Access Campaign Setup
- Navigate to Administration > Campaign Management > Create New Campaign
2. Define Campaign Details
- Name: Use a descriptive Campaign Name (e.g., "2025 Q2 CMMC Snapshot")
- Assessment Type: Select the desired framework from the available list
- Classes: Define which of the available framework classes are applicable
- Kick-Off and End Dates: Enter the date range for this Campaign
- New Engagement Name: Reference text for adding a New Engagement
- New Iteration Name: Reference text for adding a New Iteration
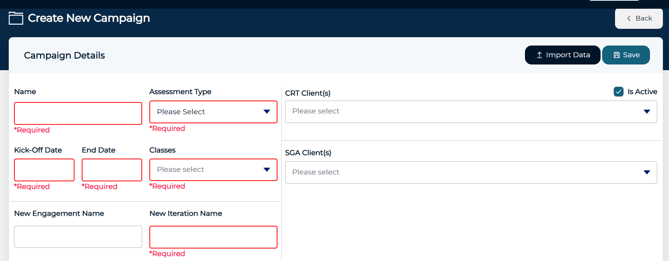
3. Select Clients
- CRT Clients: Multi-select existing CRT Clients within the Organization
- These Clients will access this Assessment through the CRT Portal
- SGA Clients: Multi-select existing SGA Clients within the Organization
- These Clients will access this Assessment through the SGA Portal
For each selected client, assign an Engagement and Iteration. You may select existing records or create new ones using the New option. When assigning a user, the list will reflect users available in the selected portal.

4. Review and Launch
Review the campaign details, ensure the campaign is marked active, and then select Save to launch the campaign.
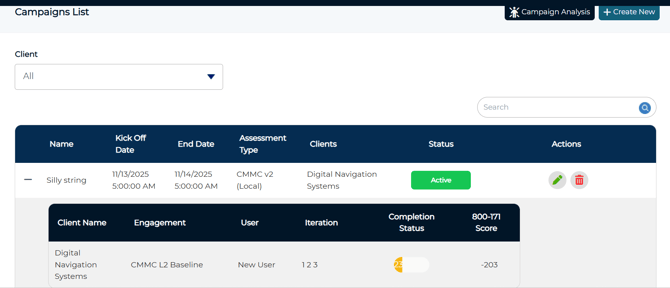
Monitor Participation
-
Navigate to Administration > Campaign Management > Manage Campaigns
-
Expand the Campaign using the plus icon to view participating clients.
-
Review Completion Status and Assessment Scores where applicable.
Campaign Analysis
Campaign Analysis provides reporting for campaign performance and results.
Generate an Analysis
- Navigate to Administration > Campaign Management > Manage Campaign
- Select the Campaign Analysis button
- Select the assessment type to analyze
- Select the assessment level to analyze (Engagement, Domain or Control)
- Select the applicable campaign(s) and client(s)
- Generate the Analysis
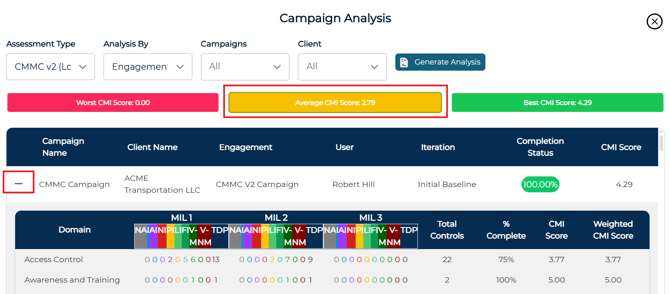
The analysis displays response trends, score distribution, and common deficiencies across selected participants. Results can be viewed within the application or exported to Excel for deeper analysis.
⚠️ Campaign analysis results are only generated when there is an active campaign with completed data for the selected assessment level.
Analysis Results by Engagement
-
Results are grouped by Worst, Average, and Best CMI score.
-
Each category and campaign is selectable to drill into detailed results.
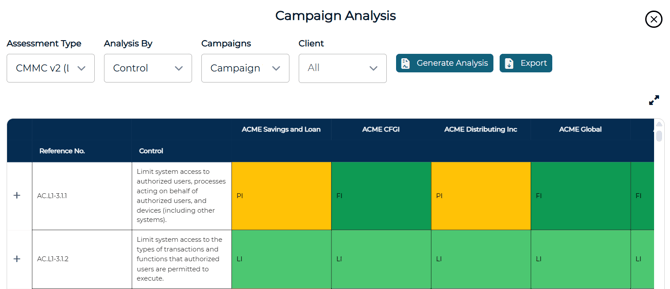
Analysis Results by Domain or Control
-
Domain level analysis supports viewing Weighted Scores.
-
Results can be exported to Excel for deeper analysis.
-
Each domain or control is expandable, and individual scores can be selected to view findings by domain.